We are Dmitry Molchanov and Julia Molchanova. We make VR games focused on intense locomotion.
Privacy policyRecreating the Doom Glare / Glow in a vertex shader
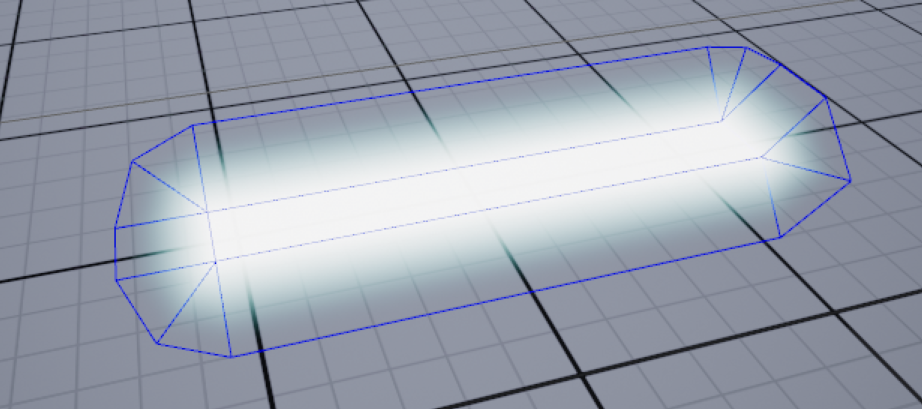
TL;DR: I’ve recreated the Doom Glow effect in a vertex shader and made it work for any convex planar shape. Grab the plugin here: https://github.com/hollowdilnik/GlowingQuad!
Bloom is a common effect that is too expensive for mobile VR, especially in Unreal Engine. Some people are making custom optimized Bloom and get rid of MSAA. Some are faking it using billboards, which can look fine from far away.
There is also a lesser-known old trick that was popularized by Doom 3. The fake glare / glow effect from Doom 3 is done by making a procedurally generated mesh that approximates the glowing outline of a quad. Since this outline is changing every frame, the mesh needs to be regenerated every frame too. This achieves a very convincing glow effect that is much cheaper than doing the true bloom. Seems to be highly desired for mobile VR!

One of the implementations of this technique transform the quad into the screen space coordinated, calculate the outline there and then transform the outline back into the world space. This is an awkward way to do it, and seems to glitch out in VR. The original implementation from Doom 3, however, is much more simple and does all calculations in the world space.
It is pretty straight-forward to reimplement the original technique in Unreal Engine. You just need access to the current camera location, and to populate the vertex data of a procedural mesh component on every tick.
It turns out, it is possible to avoid creating and deforming procedural meshes at runtime, as all these calculations (with a little bit of extra setup) can be done in a vertex shader!
The only tricky thing you need to know are the directions to the next and previous quad points for every vertex. We can’t get such information in the vertex shader by default. However, if our quad is not deformed at run-time, we can bake it into the UV coordinates!
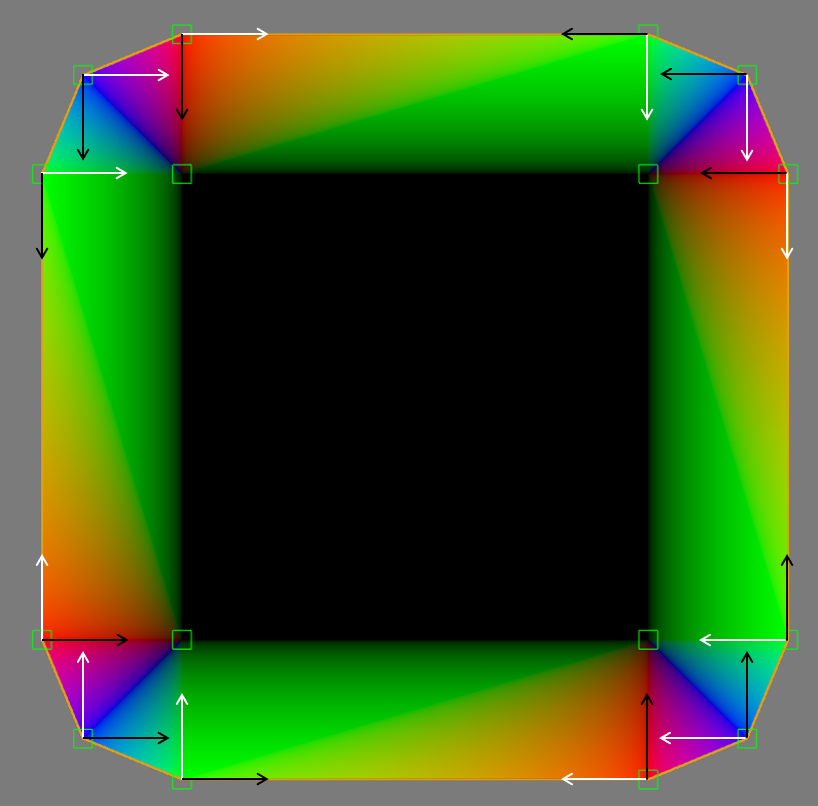
We also need to know whether the current vertex is a part of the quad or the glow, and for the glow vertices we also need to know which one of three it is (left flap, right flap or the connection). This info can be baked into vertex colors. In our case the red vertices will be offset orthogonally to the direction to the next point, the green verts will be offset orthogonally to the direction to the previous point, and the blue verts (connectors) will go along the bisector of the previous two offsets.
In the end we are left with a special kind of mesh that looks kinda like this:

The arrows denote the data that we packed into two UV channels (white is the direction to the next point, and black is the direction to the previous point), and the vertex color masks specific kinds of vertices and allows us to choose the appropriate offset. Here the width of the outline is exaggerated for this visualization. The outer verts should be in the same place as the corresponding verts of the inner quad (or a bit offset if your engine merges all degenerate triangles even if you specifically tell it not to do it >:( …).
Also, baking the data like this makes us agnostic to the original shape of the quad. We can now generate any convex planar mesh using this procedure, and the shader will do its work!

I’ve updated the plugin at https://github.com/hollowdilnik/GlowingQuad to include this shader and a tool for generating these meshes.
Finally, since this technique only works with convex shapes, I would be glad to hear any ideas regarding making it work for concave shapes too. Also let me know if someone ports it to Unity!
Relevant links
- UE4 implementation of this technique: https://github.com/hollowdilnik/GlowingQuad
- A nice explanation of the technique: https://simonschreibt.de/gat/doom-3-volumetric-glow/
- A screen space implementation in Unity (archived) http://yzergame.com/doomGlare.html
- A modern Unity world space implementation, suitable for VR https://github.com/sh0v0r/DoomGlowUnity